
 Written by:
Zarah Mae Torrazo is Head of Content at Spacer Technologies, the company behind Parkhound, WhereiPark, and Spacer.com. With 10 years of writing experience in parking, real estate, and finance, she creates content that helps drivers save money and property owners earn income from their space.
 Edited by:
Louise is an SEO Writer for Spacer Technology, creating content for the Parkhound, WhereiPark, Spacer.com.au, and Spacer.com brands. Based in the Philippines, she transitioned from her government office job to copywriting in 2012 and has stayed in content production since.
 Reviewed by:
Born with an innate entrepreneurial spirit and a thirst for all things tech, Mike founded his first business at the age of 14 by developing websites for SMEs in the mid-90’s. Now with decades of hands-on experience building startups, Mike is a seasoned tech entrepreneur with a proven track record of scaling high-growth tech companies.
First impressions matter. When drivers are scrolling through Parkhound, they’re looking for a space that feels easy, safe, and straightforward. A few good photos can be the difference between a booking and your spot being ignored.
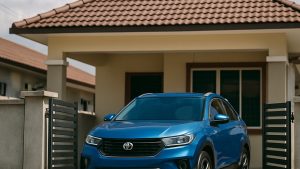
Think of your listing like an ad for your parking space. If renters can see the area where they would park their vehicle clearly, they know straight away whether it will fit their car and be easy to access. If they can’t see much, they’ll move on.
In this guide, we’ll show you how to take clear, simple photos of your space so your listing gets noticed and booked faster on Parkhound.
Good photos make drivers feel confident about booking your space. When they can clearly see size, access, and safety, they’re much more likely to trust your listing. Just as no one would rent or buy a house without seeing clear images of the rooms and entryways, drivers also expect to see a parking space before committing.
The best listing photos put hosts in the driver’s seat. Clear, bright photos build trust and help people imagine using it. Renters want to see exactly how they’ll pull in, park, and get out. These steps will help you capture the right shots.
Tidy up before snapping. Move bins, bikes, or storage boxes out of the way. Sweep if needed so the space looks neat. Most importantly, make sure the spot is empty. Drivers want to see the exact area where they will park, not your car.
Pro tip: Empty spaces always look bigger in photos. Removing clutter not only makes your spot clearer but also helps renters picture their own car fitting easily.
Natural daylight makes your space look safer, bigger, and easier to park in.
Pro tip: Take photos with the sun or main light source behind you, shining onto the space. This keeps the parking spot bright and stops your camera from capturing dark or shadowy images.
One photo isn’t enough to tell the full story. Renters want to see the space from different perspectives so they know exactly what they’re booking. Think about what you’d want to see if you were pulling up for the first time.
Key shots to include:
Pro tip: Take photos as if you’re giving directions to a friend. Start from the street, then guide them to the exact spot. It makes the listing easier to recognise and saves renters from circling around.
Extra features can make your space more appealing, but only if renters can see them. Photos are the best way to show off what makes your spot safer, easier, or more convenient than the rest.
What to include:
Pro-tip: Renters often filter for undercover spots, secure access, or EV chargers. A clear photo of these extras can help your space get booked faster.
Renters want to see the real space, not a polished version of it. Show the actual layout and surroundings so there are no surprises when drivers arrive. Remember, you don’t want your listing ending up in one of those “what I booked vs. reality” TikToks. Honest photos keep renters happy and your spot booked.
Pro tip: A photo of a garage entrance with height clearance written in the description is better than a renter arriving and finding their utes or 4WDs won’t fit.
Clear photos build trust, while poor ones can confuse renters or turn them away. Here’s a quick comparison of what works and what doesn’t.
| Good Photo | Bad Photo |
| Bright, clear, taken in daylight | Dark, blurry, or taken at night |
| Shows the whole space and entry | Cropped corner that looks confusing |
| Highlights features like cover, gates, or chargers | Hides details or skips important angles |
| Clean and uncluttered | Distracting objects like cars, trash cans, or bikes |
| Honest view with accurate size | Misleading crop that hides tight spaces or obstacles |
Not every parking space is the same. Here’s how to photograph different types of parking spaces on Parkhound:
You don’t need a fancy camera to take good photos of your space. Your smartphone is more than enough. Just use it the right way to make your photos clear and bookable.
Q: How many photos should I upload to my Parkhound listing?
Aim for 3–5 clear shots: a wide shot of the full space, a street view, and a couple of detail shots. More than one angle helps drivers book with confidence.
Q: Should I include my car in the photo?
No. Always photograph the space empty. Renters want to see exactly where their car will fit without distractions.
Q: Can I take parking photos at night?
Stick to daylight whenever possible. Natural light shows the space more clearly. The only exception is if your space has strong built-in lighting, such as in a garage, where one night photo can help.
Q: What if my parking space is narrow or tricky to access?
Show it honestly. Take photos of the entrance, exit, or tight angles and mention clearance in your description. Renters will appreciate the accuracy.
Q: Do I need a professional camera to take photos?
No. A smartphone is more than enough. Just hold it horizontally, use daylight, and avoid filters.
Q: Should I edit my parking space photos before uploading?
Keep edits simple. Cropping and light adjustments are fine, but avoid heavy filters. Renters expect accuracy, not stylised shots.
Q: Do clear photos actually help me get booked faster?
Yes. Parkhound data shows that listings with photos are 45 percent more likely to be reserved, and about 20 percent of drivers skip listings without them.
Q: Should I include features like gates or EV chargers in my photos?
Yes. If your spot has extras such as undercover parking, security, or EV charging, take clear photos of them. Many renters filter by these features, so showing them helps your listing stand out.
Spending a few minutes taking clear photos can make the difference between your spot sitting empty and getting booked. Honest, well-lit images help drivers trust your listing and choose your space over others.
If you’re new to hosting, check out our guide on How to Rent Out Your Space with Parkhound for more tips on setting up your listing and becoming a successful host.
Not a host yet? Join the thousands of hosts across Melbourne, Sydney, Perth, Brisbane, and other locations who are earning passive income from their extra space!

Zarah Mae Torrazo is Head of Content at Spacer Technologies, the company behind Parkhound, WhereiPark, and Spacer.com. With 10 years of writing experience in parking, real estate, and finance, she creates content that helps drivers save money and property owners earn income from their space.
Zarah Mae Torrazo is Head of Content at Spacer Technologies, the company behind Parkhound, WhereiPark, and Spacer.com. With 10 years of writing experience in parking, real estate, and finance, she creates content that helps drivers save money and property owners earn income from their space.
This will close in 0 seconds
This will close in 0 seconds